
How to Clean Flux Residue From a PCB Safely: Step-by-Step Guide
Learn how to remove no-clean, rosin and sticky flux residue without spreading contamination or damaging PCB components, plastics and protective coatings.
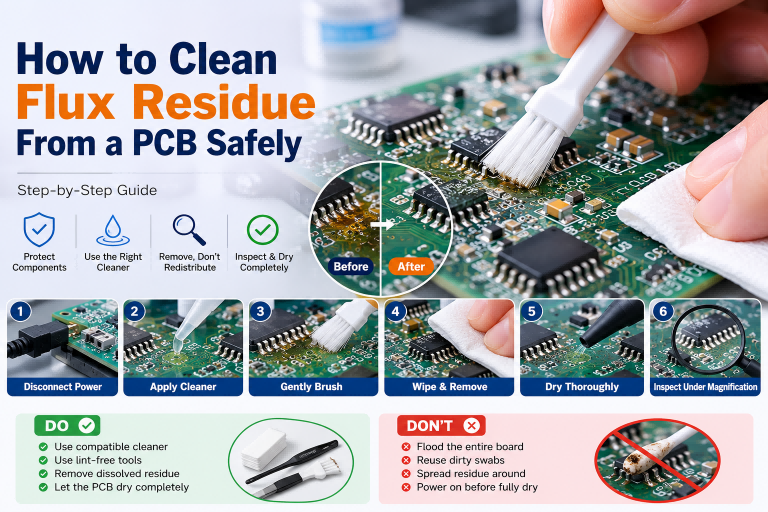
Quick answer: Disconnect all power, identify the flux type, choose a compatible electronics flux remover, apply it only to the contaminated area, gently loosen the residue and then physically remove the dissolved contamination with clean lint-free materials. Allow the PCB to dry completely and inspect it before restoring power.
Flux supports reliable soldering by reducing surface oxidation and improving solder wetting. After soldering or desoldering, however, some flux solids remain on the circuit board.
Depending on the flux formulation and soldering process, the residue may appear clear, amber, brown, white, sticky or hardened. Some properly activated no-clean residues may be permitted to remain, while other residues must be removed because of contamination, corrosion risk, inspection requirements or compatibility with later processes.
Safe PCB cleaning requires more than simply making the residue wet. The residue must be dissolved, loosened and physically removed from the circuit board instead of being spread into a larger area.
Do You Always Need to Clean Flux Residue?
No. The decision depends on the flux classification, activation condition, residue volume and requirements of the circuit assembly.
Cleaning May Not Be Required When
- The residue comes from an approved no-clean flux.
- The flux was correctly activated during soldering.
- The residue is thin, dry and localized.
- The product instructions permit the residue to remain.
- The residue does not affect inspection or testing.
- No coating, bonding or further assembly step is required.
Cleaning Is Recommended When
- The residue is sticky, thick or visibly contaminated.
- Too much flux was applied.
- Flux remained outside the heated area.
- The PCB requires conformal coating or adhesive bonding.
- The circuit contains sensitive or high-impedance areas.
- The flux manufacturer requires cleaning.
- The board must pass detailed visual inspection.
Identify the Flux Type Before Cleaning
Different fluxes require different cleaning methods. Check the product label, technical data sheet or soldering material documentation before selecting a cleaner.
| Flux Type | Typical Residue | General Cleaning Approach |
|---|---|---|
| No-clean flux | Clear, light amber or slightly tacky residue | Clean when excessive, unactivated or required by the assembly |
| Rosin or RMA flux | Amber, brown or hardened resin residue | Use a compatible rosin flux remover or approved solvent |
| Water-soluble or organic-acid flux | Active, potentially hygroscopic residue | Requires thorough aqueous cleaning according to process instructions |
| Unknown flux | Uncertain composition and compatibility | Identify the material or test the cleaner before proceeding |
What Tools Do You Need?
- Electronics-compatible flux remover or approved solvent
- ESD-safe soft brush
- Lint-free wipes or cleanroom swabs
- Absorbent material for removing contaminated liquid
- Magnification for inspection
- Suitable gloves and eye protection
- Ventilation or fume extraction
- Compressed air approved for electronics, when appropriate
Avoid paper towels that release fibers, hard brushes that can damage small components and aggressive solvents that have not been confirmed safe for the PCB materials.
How to Choose a PCB Flux Remover
The correct cleaner must dissolve the residue without damaging the circuit board, component markings, plastics, adhesives, conformal coatings or display materials.
| Cleaner | Best Use | Important Considerations |
|---|---|---|
| Dedicated electronics flux remover | General PCB flux cleaning | Select a formula compatible with the flux and board materials |
| Isopropyl alcohol | Some light and soluble residues | May not remove all flux types and can smear dissolved residue if it is not physically removed |
| Water-based electronics cleaner | Compatible water-soluble residues and controlled cleaning processes | Requires proper rinsing, drying and material compatibility |
| Heavy-duty flux remover | Difficult or baked-on residue | Some aggressive formulas are not safe for plastics |
| Acetone or unknown industrial solvent | Not recommended without verified compatibility | May damage plastics, coatings, labels and component materials |
How to Clean Flux Residue From a PCB
Disconnect All Power
Switch off the device, unplug external power and remove batteries whenever practical.
Never apply liquid cleaner to a powered circuit board.
Allow the PCB to Cool
Wait until the soldering area has returned to a safe handling temperature. Applying volatile cleaner to a hot board can cause rapid evaporation and reduce cleaning control.
Inspect the Board
Use magnification to identify flux residue, solder bridges, damaged pads, loose components and areas that should not be exposed to liquid.
Pay special attention to switches, microphones, displays, sockets, connectors and unsealed sensors.
Confirm the Flux and Cleaner
Identify whether the residue comes from no-clean, rosin or water-soluble flux. Select a cleaner approved for that residue and the PCB materials.
Protect Sensitive Components
Position the board so cleaner does not flow into connectors, switches, displays or other enclosed components.
Use controlled spot cleaning instead of flooding the entire board when only a small repair area requires cleaning.
Apply a Controlled Amount of Cleaner
Apply enough cleaner to soften and dissolve the residue without allowing unnecessary liquid to spread across the assembly.
A brush applicator, precision dispenser or lightly saturated swab provides better control than pouring solvent over the PCB.
Gently Agitate the Residue
Use a soft ESD-safe brush or lint-free swab to loosen the dissolved flux.
Brush around component leads and pads carefully. Avoid bending fine-pitch pins or dislodging small SMD components.
Remove the Contaminated Liquid
Absorb or rinse away the dissolved flux with clean lint-free material. Replace the wipe or swab as soon as it becomes dirty.
Do not repeatedly move the same contaminated swab over the PCB because this can redistribute the residue.
Repeat With Clean Materials
Apply fresh cleaner and repeat the process when a visible film remains.
The final pass should use clean solvent and clean lint-free material rather than the contaminated tools used during the first pass.
Dry the PCB Completely
Allow the cleaner to evaporate from the visible surface and from underneath components.
Do not reconnect power until the board is fully dry and free from trapped liquid.
Inspect the Cleaned Area
Use magnification to look for remaining residue, white deposits, solder bridges, fibers, loose pads and damaged component leads.
Restore Power Only After Final Verification
Reconnect the board only after confirming that the assembly is dry, clean and mechanically intact.
Can You Clean Flux With Isopropyl Alcohol?
Isopropyl alcohol can clean some flux residues, but it is not a universal solution.
Its effectiveness depends on:
- The flux chemistry
- How heavily the residue has been heated
- The alcohol concentration and purity
- The amount of residue
- The cleaning method
- The compatibility of nearby materials
A common mistake is to use a small alcohol-soaked swab and move the same dissolved residue around the board. This may leave a thin sticky film or white deposit after the alcohol evaporates.
Use enough clean material to carry the dissolved residue away, and change swabs or wipes frequently.
Why Does White Residue Appear After Cleaning?
White residue can appear when dissolved flux is spread across the PCB and allowed to dry in a new location.
Other possible causes include:
- The cleaner is not compatible with the flux.
- The residue was only partially dissolved.
- A dirty brush or swab was reused.
- Contaminated cleaner dried on the board.
- Minerals or other contamination were introduced.
- The final rinse was incomplete.
How to Remove White Flux Residue
Use a cleaner compatible with the original flux, gently loosen the deposit and remove the contaminated liquid with fresh lint-free materials.
How to Clean Sticky No-Clean Flux
Sticky no-clean residue usually requires a compatible cleaner and controlled mechanical agitation.
- Confirm that cleaning is required.
- Select a cleaner intended for no-clean residue.
- Apply it locally to the sticky area.
- Allow enough contact time to soften the residue.
- Agitate with a soft ESD-safe brush.
- Remove dissolved residue with clean lint-free material.
- Repeat with fresh cleaner when necessary.
- Dry and inspect the board before use.
Read our related guide: Why Does Soldering Flux Turn Brown or Sticky?
How to Clean Flux Around Fine-Pitch Components
Fine-pitch ICs and densely populated PCB areas require controlled cleaning because residue can remain between closely spaced leads or underneath component edges.
- Use magnification before and after cleaning.
- Apply cleaner with a precision brush or dispenser.
- Brush parallel to component leads when possible.
- Avoid pulling sideways on fine pins.
- Do not flood the board unnecessarily.
- Use fresh lint-free material for the final pass.
- Allow extra drying time for liquid trapped beneath components.
Cleaning Flux After Using Desoldering Wick
Additional flux is sometimes used with desoldering wick to improve solder wetting and absorption. After desoldering, the repair area may contain:
- Flux residue
- Small solder particles
- Copper-braid fibers
- Oxidized solder contamination
- Residue transferred from the soldering iron tip
Inspect the cleaned PCB pad carefully before installing a replacement component.
Related guide: Do You Need Flux When Using Desoldering Wick?
Common PCB Flux Cleaning Mistakes
Using Too Much Solvent
Flooding can move dissolved residue into connectors, switches and underneath components.
Using the Same Dirty Swab Repeatedly
A contaminated swab spreads dissolved flux across the PCB.
Assuming IPA Removes Every Flux
Some hardened or specialized residues require a dedicated flux remover.
Using Aggressive Solvent Without Testing
Strong cleaners can damage plastics, labels, coatings and display materials.
Powering the PCB Before It Is Dry
Liquid trapped beneath components or inside connectors can affect the circuit.
Cleaning Without Inspecting the Solder Joint
A visually clean board can still contain solder bridges, cold joints or damaged pads.
How to Prevent Excessive Flux Residue
Apply Less Flux
Use only enough flux to wet the solder joint and support solder flow.
Control Temperature
Avoid excessive temperature that burns or hardens the residue.
Use Efficient Tip Contact
A clean, properly tinned tip reduces the time the PCB is heated.
Keep Flux Localized
Precision syringe application reduces unnecessary contamination.
Clean Between Rework Cycles
Remove old residue before adding more flux to the same repair area.
Store Flux Correctly
Keep the container sealed and follow the specified storage conditions.
Frequently Asked Questions
What is the safest way to clean flux from a PCB?
Disconnect power, identify the flux, use a compatible electronics cleaner, gently loosen the residue, physically remove the dissolved contamination and allow the board to dry completely before use.
Can I use isopropyl alcohol to clean PCB flux?
Isopropyl alcohol can remove some flux residues, but it may not work on every formulation. Use clean lint-free materials so dissolved residue is removed rather than spread across the board.
Do I need to clean no-clean flux?
Not always. Cleaning may still be required when residue is excessive, sticky, unactivated, contaminated or incompatible with inspection, coating or circuit requirements.
Why does my PCB turn white after cleaning flux?
White residue often appears when dissolved flux is redistributed and allowed to dry, or when the cleaner is not compatible with the residue.
Can water be used to clean PCB flux?
Water should only be used when the flux and cleaning process are designed for aqueous cleaning. The board must be properly rinsed and dried before power is restored.
Can acetone be used to clean a PCB?
Acetone can damage plastics, coatings, labels and some component materials. Do not use it unless compatibility has been specifically confirmed.
How long should a PCB dry after cleaning?
Drying time depends on the cleaner, board design and whether liquid entered beneath components or connectors. Restore power only after confirming the board is completely dry.
Should flux be cleaned before conformal coating?
Residue can interfere with coating adhesion and reliability. Follow the coating and flux manufacturers’ surface-cleanliness requirements.
Use the Right Flux and Cleaning Process
Reliable PCB cleaning depends on the flux formulation, cleaner compatibility, application method and complete removal of dissolved residue.
SATZOZZ provides microsoldering tools for PCB repair, including NC559 No-Clean Flux, desoldering wick and ultra-fine precision tweezers.
- Controlled syringe flux application
- Desoldering wick widths from 1.0 mm to 3.0 mm
- Precision tweezers for SMD handling
- Suitable for PCB repair and microsoldering workflows
- Wholesale and private-label cooperation available
Technical References
Need Microsoldering Tools for PCB Repair?
Explore SATZOZZ flux, desoldering wick and precision tools, or contact our team for wholesale, distributor and private-label inquiries.
View SATZOZZ Products Contact SATZOZZ