
How to Use Desoldering Wick Without Damaging PCB Pads
Learn how to remove solder efficiently while reducing the risk of lifted pads, damaged solder masks, overheated components and unnecessary PCB rework.
Quick answer: Use a desoldering wick that closely matches the width of the solder joint, place a clean section of braid over the solder, apply a clean and properly heated soldering iron tip, and lift the iron and wick away together as soon as the solder flows into the braid. Avoid prolonged heating, excessive pressure and pulling cold wick from the PCB.
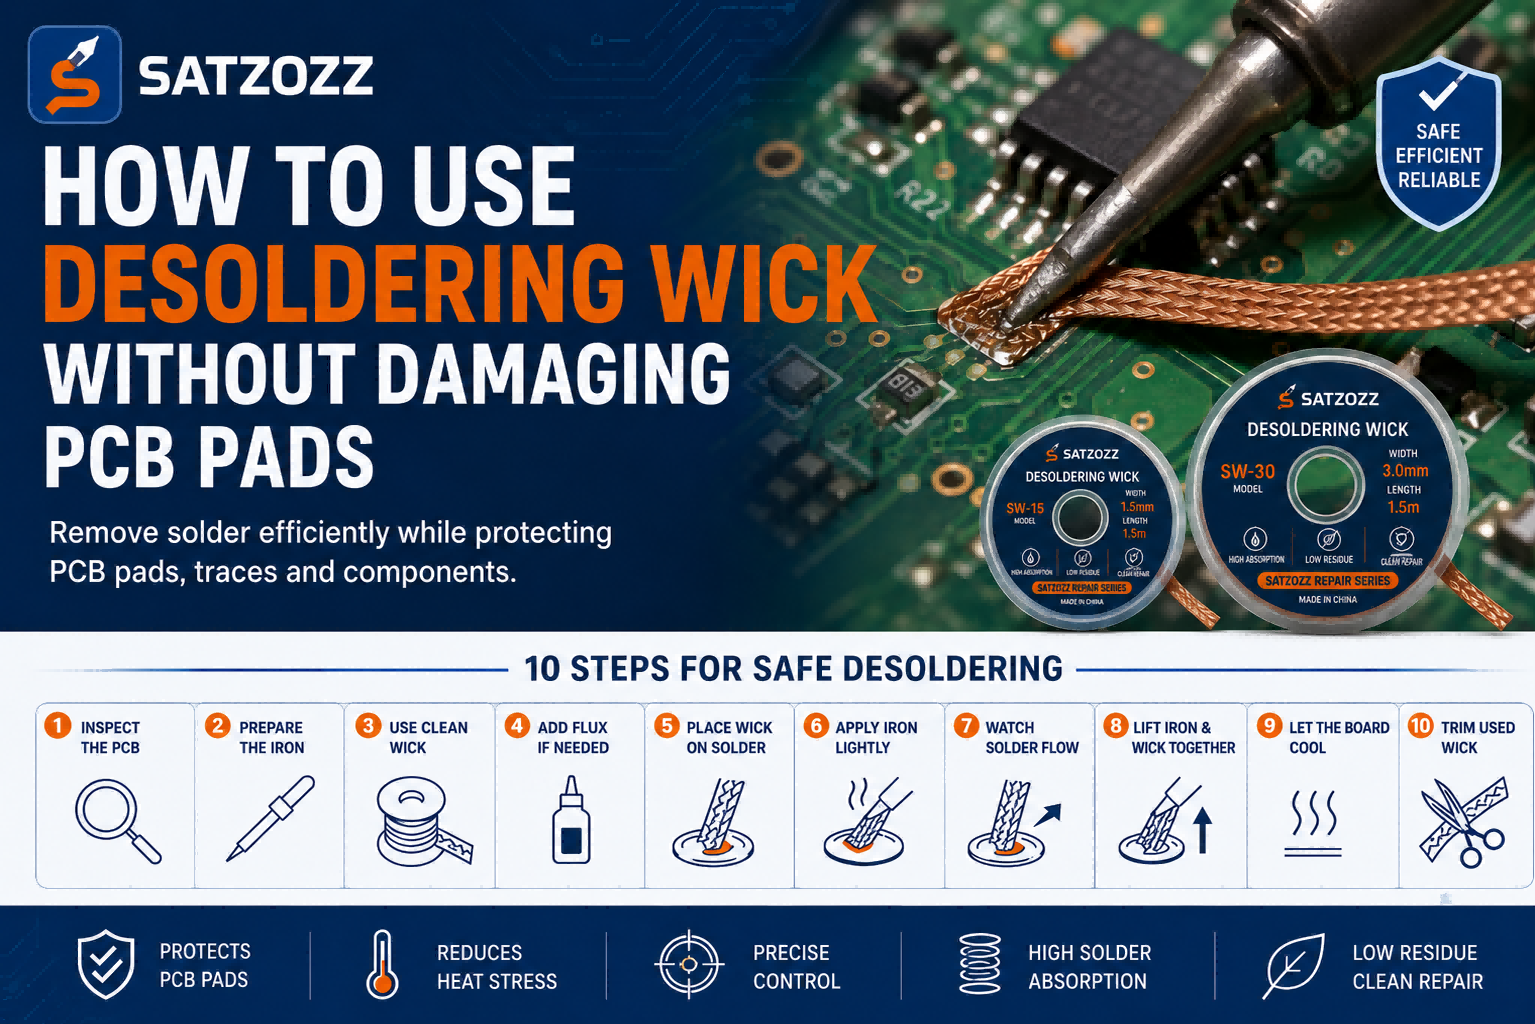
Desoldering wick is one of the most precise tools for removing solder from PCB pads, component leads, through-holes and solder bridges. When used correctly, the braided copper structure absorbs molten solder and leaves the repair area clean and ready for rework.
However, poor technique can expose a circuit board to unnecessary heat and mechanical stress. This may result in lifted copper pads, damaged traces, discolored solder masks or weakened component connections.
This guide explains how to use desoldering wick safely, how to control heat transfer and how to avoid the most common PCB repair mistakes.
Why Can Desoldering Wick Damage PCB Pads?
The wick itself does not normally damage a PCB. Most pad damage occurs because of excessive heat, excessive pressure or incorrect removal technique.
Excessive Heating Time
Keeping the soldering iron on the braid for too long can weaken the adhesive bond between the copper pad and the PCB substrate.
Pulling Before the Solder Releases
If the wick is pulled while solder is still solid or partially solidified, it may pull on the pad or component lead.
Using Too Much Pressure
Pressing the soldering iron heavily into the PCB can scratch the solder mask, deform pads and increase mechanical stress.
Choosing the Wrong Wick Width
Wick that is too wide may require more heat, while wick that is too narrow may require repeated heating cycles to remove the same amount of solder.
Tools You Need Before Desoldering
Prepare the correct tools before heating the PCB. Good preparation reduces the time that the soldering iron needs to remain in contact with the repair area.
- Desoldering wick in the correct width
- Temperature-controlled soldering iron
- Clean soldering iron tip with suitable contact area
- Flux suitable for electronics rework, when required
- Precision tweezers for handling small components
- Flush cutters or scissors for trimming used braid
- PCB holder or heat-resistant work surface
- Magnification for fine-pitch repair
How to Choose the Correct Wick Width
Select a braid width that covers most of the solder joint without extending unnecessarily onto nearby pads or components.
| Repair Type | Suggested Wick Width | Reason |
|---|---|---|
| Fine-pitch IC pads | 1.0–1.5 mm | Provides accurate control around closely spaced pins |
| Small SMD pads | 1.0–1.5 mm | Limits heat exposure to nearby components |
| General PCB repair | 1.5–2.0 mm | Balances solder absorption and handling control |
| Connector and through-hole joints | 2.0–2.5 mm | Provides increased absorption capacity |
| Large pads and power terminals | 2.5–3.0 mm | Suitable for larger solder volumes and broader joints |
SATZOZZ Desoldering Wick is available in five widths: SW-10 at 1.0 mm, SW-15 at 1.5 mm, SW-20 at 2.0 mm, SW-25 at 2.5 mm and SW-30 at 3.0 mm.
How to Use Desoldering Wick Safely
Secure and Inspect the PCB
Place the circuit board on a stable, heat-resistant surface or PCB holder. Inspect the pad, trace and surrounding components before applying heat.
Look for existing pad damage, loose copper, cracked solder joints or heat-sensitive components close to the repair area.
Prepare the Soldering Iron Tip
Use a clean, properly tinned soldering iron tip. A clean tip transfers heat more efficiently and reduces the amount of time required to melt the solder.
Select a tip with enough contact area to heat the braid evenly. A very small tip may struggle to transfer sufficient heat through wider wick.
Use a Clean Section of Wick
Pull a fresh section of braid from the spool. Do not begin with a section that already contains solder because saturated wick has reduced absorption capacity.
Keep the braid flat and avoid twisting it before placing it on the PCB pad.
Add Flux When Necessary
If the existing solder is oxidized or does not flow easily, apply a small amount of electronics-grade flux to the joint or braid.
Flux improves wetting and can help the molten solder enter the copper braid more quickly, reducing heating time.
Place the Wick Over the Solder Joint
Position the braid directly over the solder that needs to be removed. Keep the wick centered on the target area and away from unrelated pads.
For fine-pitch components, use magnification to confirm that the wick is covering only the intended pins or pads.
Apply the Iron With Light Pressure
Place the heated soldering iron tip on top of the braid. Apply only enough pressure to maintain good thermal contact.
Do not press the braid hard into the PCB. Efficient solder removal depends on heat transfer and capillary action, not mechanical force.
Watch for the Solder to Flow
As the solder melts, it will travel into the braided copper structure. The wick may become visibly darker or silver as it absorbs solder.
Once the required solder has entered the braid, stop heating immediately. Avoid holding the iron in place after absorption has stopped.
Lift the Iron and Wick Together
Remove the soldering iron and braid from the PCB at the same time, while the solder is still molten.
Do not pull the wick sideways across the pad. Lift it vertically or at a gentle angle to minimize mechanical stress.
Allow the Board to Cool
If additional solder remains, allow the repair area to cool briefly before performing another heating cycle.
Repeated continuous heating can weaken pads and traces, especially on older, thin or previously repaired circuit boards.
Trim the Used Wick
Cut off the section of braid that has absorbed solder. Use a fresh section for the next joint or heating cycle.
Inspect the PCB pad under magnification before installing a replacement component.
How to Control Heat and Protect PCB Pads
Use the Lowest Effective Temperature
Use the lowest soldering temperature that melts the solder reliably and allows it to flow into the braid. The correct setting depends on the solder alloy, board construction, component size and soldering iron performance.
An excessively low setting can also be harmful because it may require a much longer heating time. Efficient heat transfer is generally safer than prolonged contact with insufficient heat.
Use Short Heating Cycles
Heat the joint only long enough for solder to enter the wick. If the solder does not flow, remove the iron, inspect the tip and add flux before trying again.
Avoid repeatedly heating the same area without allowing the PCB to cool.
Match the Tip to the Wick
The soldering iron tip should contact enough of the braid to transfer heat efficiently. A wide braid combined with a very fine tip may heat unevenly and encourage longer contact time.
Do Not Scrub the PCB
Moving the braid aggressively across the pad can scratch the solder mask or stress weakened copper. Keep movement controlled and minimal.
Common Mistakes That Cause Lifted Pads
| Mistake | Possible Result | Better Technique |
|---|---|---|
| Pulling cold wick from the PCB | Lifted pads or damaged traces | Reheat gently and lift the wick while solder is molten |
| Holding the iron in one place too long | Discoloration, delamination or weakened pad adhesion | Use short heating cycles and efficient heat transfer |
| Using excessive downward pressure | Scratched solder mask or deformed pads | Apply only light pressure for thermal contact |
| Using saturated braid | Poor absorption and repeated heating | Trim the used section and continue with clean wick |
| Using wick that is too wide | Unnecessary heat exposure | Match braid width to the pad or solder joint |
| Using a dirty or oxidized iron tip | Slow heating and poor solder flow | Clean and tin the tip before desoldering |
Why Is the Desoldering Wick Not Absorbing Solder?
If solder does not flow into the braid, the problem is usually related to heat transfer, oxidation or wick saturation.
- The soldering iron tip may be dirty or oxidized.
- The iron may not provide enough heat for the joint and braid width.
- The braid may already be saturated with solder.
- The solder joint may contain oxidized or contaminated solder.
- The wick may not be making full contact with the solder joint.
- The selected braid may be too wide for the soldering iron tip.
- Additional flux may be required to improve solder flow.
Stop and correct the cause rather than continuing to heat the PCB. Prolonged heating without solder absorption increases the risk of pad damage.
Signs That a PCB Pad Is Overheating
Stop heating and inspect the board if you notice any of the following:
- The solder mask becomes darker, soft or discolored.
- The copper pad begins to move when touched.
- The PCB surface starts to bubble or delaminate.
- A pad edge begins lifting from the substrate.
- The board produces an unusual burnt odor.
- Nearby plastic connectors begin to soften.
Allow the board to cool before continuing. If the pad is already loose, avoid additional pulling or lateral movement.
Can Desoldering Wick Be Used on Fine-Pitch Components?
Yes. Narrow desoldering wick can be used to remove solder bridges and clean fine-pitch IC pads, provided that the braid is carefully positioned and heat is controlled.
For small IC pins and compact PCB pads, 1.0 mm or 1.5 mm wick provides better control than wider braid. Magnification and a fine soldering iron tip are also recommended.
Avoid dragging braid across multiple pins. Position it over the target area, allow the solder to flow and lift it away vertically.
Should You Add Flux to Desoldering Wick?
Many desoldering tasks can be completed without additional flux, but adding a small amount may improve solder wetting when working with oxidized joints, lead-free solder or older circuit boards.
Use only a controlled amount of electronics-grade flux. Excess flux can spread across the PCB and may require additional cleaning.
Desoldering Wick vs Solder Sucker
| Tool | Best Use | Main Advantage |
|---|---|---|
| Desoldering Wick | Cleaning pads, removing solder bridges and precision PCB work | Provides controlled, close-contact solder removal |
| Manual Solder Sucker | Removing larger amounts of solder from through-holes | Can remove molten solder quickly from open joints |
| Desoldering Station | Frequent through-hole component removal | Combines heating and powered suction |
In many repair situations, technicians use a solder sucker to remove most of the solder and then use desoldering wick to clean the remaining solder from the pad.
Frequently Asked Questions
How do I use desoldering wick without lifting PCB pads?
Use the correct braid width, a clean soldering iron tip and short heating cycles. Lift the iron and wick together while the solder is still molten, and never pull cold braid from the PCB.
Should I press hard on desoldering wick?
No. Apply only light pressure to maintain thermal contact. Excessive force does not improve capillary absorption and may damage the PCB surface.
Why does desoldering wick stick to the PCB?
The solder may have cooled and bonded the braid to the joint. Reheat the area gently until the solder melts, then lift the iron and wick together.
Can too much heat damage a PCB pad?
Yes. Prolonged or repeated heating can weaken the adhesive holding the copper pad to the PCB substrate, increasing the risk of lifting or delamination.
Do I need to add flux when using solder wick?
Additional flux is not always required, but it can improve solder flow when working with oxidized joints, older solder or difficult lead-free solder.
What desoldering wick width is best for general PCB repair?
A 2.0 mm wick is a versatile general-purpose size. Fine-pitch work may require 1.0 or 1.5 mm braid, while larger pads may require 2.5 or 3.0 mm.
Can I reuse a section of wick that already contains solder?
No. A solder-filled section has reduced absorption capacity. Cut off the used section and continue with clean braid.
Use SATZOZZ Desoldering Wick for Controlled PCB Repair
SATZOZZ Desoldering Wick is designed for PCB pad cleaning, component desoldering, solder bridge removal and electronics maintenance.
- Five widths from 1.0 mm to 3.0 mm
- Models SW-10, SW-15, SW-20, SW-25 and SW-30
- 1.5 meters of braided copper wick per roll
- Individual resealable retail pouch
- Single-model and mixed-set options
- Wholesale and private-label cooperation available
Looking for Desoldering Wick for PCB Repair?
Explore the complete SATZOZZ Desoldering Wick range or contact us for wholesale, distributor and private-label inquiries.
View Desoldering Wick Contact SATZOZZ